Polycom HD Voice Phone Instructions Manual ─ Comprehensive Guide
This comprehensive guide details Polycom HD Voice phone setup‚ call management‚ and advanced features. It covers everything from initial configuration to troubleshooting common issues‚ ensuring optimal performance.
Polycom HD Voice phones represent a significant advancement in business communication technology. These phones are engineered to deliver crystal-clear audio‚ enhancing call quality and improving overall communication effectiveness. The VVX series – including models 301‚ 401‚ 501‚ and 601 – are designed for a range of business needs‚ offering a robust feature set and user-friendly interface.

These phones support a maximum of 24 active‚ incoming‚ and held audio calls simultaneously‚ though only one active conversation can occur at a time. System administrators can configure up to six unique extension numbers per phone‚ providing flexibility and scalability. Whether utilizing the handset‚ speakerphone‚ or a headset‚ Polycom HD Voice phones prioritize a superior audio experience. This manual will guide you through setup‚ operation‚ and troubleshooting to maximize your phone’s capabilities.
Understanding Key Features and Benefits
Polycom HD Voice phones boast a suite of features designed to streamline communication and boost productivity. Key benefits include exceptional audio clarity‚ minimizing strain during long calls and ensuring message comprehension. The intuitive interface‚ coupled with line keys and extension number capabilities‚ allows for efficient call handling and management.
VVX models offer flexibility with multiple call options – handset‚ speakerphone‚ and headset – enabling users to adapt to various environments. The integrated dialer function and call history provide quick access to frequently contacted numbers. Furthermore‚ the ability to switch seamlessly between communication methods during a call enhances convenience. With support for up to 24 simultaneous calls and customizable settings‚ these phones cater to diverse business requirements‚ improving overall communication workflows.

Phone Setup and Initial Configuration
Proper setup is crucial for optimal performance. This section guides you through unboxing‚ network connection‚ and initial activation of your Polycom HD Voice phone.
Unboxing and Component Checklist
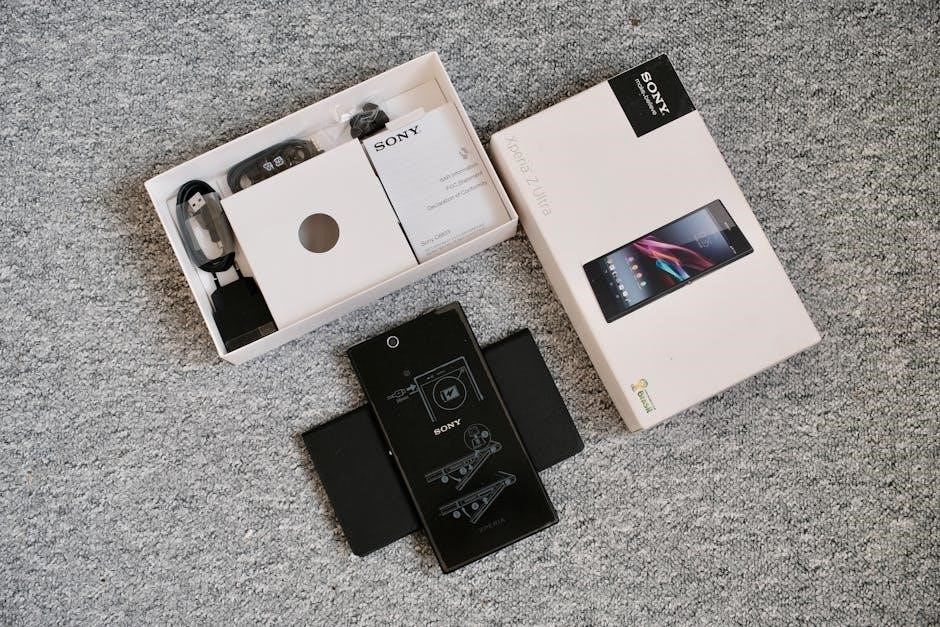
Upon receiving your Polycom HD Voice phone‚ carefully unpack the box and verify all components are present. The standard package typically includes the Polycom phone unit itself – VVX 301‚ 401‚ 501‚ or 601 models – alongside a handset with a curly cord. You should also find a network cable (Ethernet/LAN cable) for connecting the phone to your network.
Additionally‚ check for a power adapter specifically designed for your region’s electrical standards. Some bundles may include a quick start guide offering basic setup instructions. It’s important to note that a headset is often sold separately and isn’t always included in the initial package. Inspect all items for any physical damage that may have occurred during shipping. If anything is missing or damaged‚ contact your system administrator or Polycom support immediately for assistance and replacements.
Connecting the Phone to the Network
To establish network connectivity‚ locate the Ethernet port on the rear of your Polycom phone. Insert one end of the provided network cable securely into this port. Then‚ connect the other end of the cable to an available Ethernet port on your network wall jack or network switch. Ensure the connection is firm to prevent intermittent network issues.
For VVX models (301‚ 401‚ 501‚ and 601)‚ a wired network connection is essential for initial setup and operation. Wireless connectivity is not a standard feature. Once physically connected‚ the phone will attempt to obtain an IP address automatically via DHCP. Verify the network connection by observing the phone’s display for network status indicators. If the phone fails to connect‚ consult your system administrator to confirm network access and proper configuration.
Initial Power-Up and Activation
After connecting the phone to the network‚ connect the power adapter to the designated power port on the rear of the Polycom device. Plug the adapter into a working electrical outlet. The phone will automatically power on‚ initiating the boot-up sequence. Allow several moments for the phone to fully load its operating system and establish a connection with the voice network.
During activation‚ the phone may display a progress bar or status messages. The phone relies on a provisioning server managed by your system administrator to download the necessary configuration files. If activation fails‚ verify the network connection and contact your IT support team. Successful activation is indicated by a fully functional user interface‚ displaying line keys and available features. Ensure the date and time are correctly set for optimal call functionality.

Making and Receiving Calls
This section details how to initiate and answer calls using the handset‚ speakerphone‚ or headset‚ alongside utilizing the dialer and call history features.
Placing Audio Calls ─ Handset‚ Speakerphone‚ Headset
You have multiple options for placing audio calls with your Polycom phone – utilizing the handset‚ the convenient speakerphone‚ or a preferred headset. To initiate a call using the dialer‚ begin by either directly typing the desired phone number or selecting a pre-programmed line key. Alternatively‚ you can simply pick up the handset‚ or activate the Speakerphone or Headset key before dialing.
Once a method is selected‚ enter the complete number or choose a recent contact. On VVX 501 and 601 models‚ access the onscreen keyboard icon to input numbers efficiently. For VVX 301 and 401 phones‚ select the ‘Dial’ option. VVX 501 and 601 users should tap the ‘Dial’ icon to connect. These straightforward steps ensure a seamless call placement experience‚ adapting to your preferred communication style.
Using the Dialer Function
The dialer function on your Polycom phone provides a simple and efficient way to initiate calls. You can begin dialing in several ways‚ offering flexibility to suit your workflow. Start by directly entering a phone number using the keypad. Alternatively‚ you can quickly press a pre-configured line key for frequently called numbers. For immediate access‚ simply lift the handset‚ or activate either the Speakerphone or Headset key before inputting the desired number.
On VVX 501 and 601 models‚ a convenient onscreen keyboard icon is available for number entry. VVX 301 and 401 phones utilize a dedicated ‘Dial’ selection. Following number input‚ tap the ‘Dial’ icon on VVX 501/601 phones to connect your call. This intuitive dialer function streamlines the call initiation process‚ ensuring a user-friendly experience.

Redialing a Number ⏤ Accessing Call History
Your Polycom phone conveniently maintains a record of all outgoing calls‚ allowing for quick and easy redialing of recent contacts. Accessing this call history is straightforward‚ offering a time-saving feature for frequently contacted numbers. You can initiate a redial in two simple ways: either by selecting the dedicated ‘Redial’ icon prominently displayed on the Home screen‚ or by pressing the ‘Redial’ soft key during a call or while navigating the phone’s interface.
This feature eliminates the need to manually re-enter previously dialed numbers‚ enhancing efficiency. The phone automatically stores these records‚ providing a readily available list of your recent calls. Utilizing the redial function ensures you can quickly reconnect with contacts without the hassle of recalling or re-typing lengthy phone numbers.
Answering Incoming Calls
When receiving a call on your Polycom HD Voice phone‚ a visual notification will appear on the display‚ indicating an incoming connection. To answer the call‚ simply lift the handset from the cradle. Alternatively‚ you can press the dedicated Speakerphone key to answer the call hands-free‚ utilizing the phone’s built-in speaker. If you have a headset connected‚ pressing the Headset key will answer the call and automatically route the audio through your headset.
The phone’s interface provides clear visual cues to indicate an active incoming call‚ ensuring you don’t miss important communications. Each method offers a convenient way to connect‚ adapting to your preferred calling style. Promptly answering the call establishes the connection and allows for clear‚ high-definition voice communication.

Call Management Features
Effectively manage your calls with features like hold‚ transfer‚ and conference calling‚ seamlessly switching between handset‚ headset‚ and speakerphone for optimal control.
Switching Between Handset‚ Headset‚ and Speakerphone
During an active call‚ Polycom phones offer flexible options for audio delivery. To seamlessly transition between the handset‚ headset‚ and speakerphone‚ simply utilize the corresponding keys on your device. If you are currently engaged in a conversation using the handset‚ pressing the Headset key will instantly switch the audio to your connected headset.
Conversely‚ pressing the Speakerphone key will activate the speakerphone‚ allowing for hands-free communication. The Speakerphone key illuminates green when the speakerphone is actively in use‚ providing a clear visual indicator. You can easily cycle through all three options – handset‚ headset‚ and speakerphone – by repeatedly pressing the appropriate keys during the call. This dynamic switching capability ensures a comfortable and convenient calling experience tailored to your specific needs and environment.
Putting a Call on Hold
Polycom HD Voice phones provide a straightforward method for temporarily suspending an active call. To place a caller on hold‚ utilize the dedicated ‘Hold’ soft key located on your phone’s interface. Pressing this key will immediately mute your audio and inform the other party that they have been placed on hold‚ typically with a distinct hold tone or announcement.
To resume the call‚ simply press the ‘Resume’ or ‘Hold’ soft key again. The phone will reconnect you to the caller‚ continuing the conversation where it left off. Remember that while a call is on hold‚ you may be able to answer other incoming calls‚ depending on your system’s configuration. Efficiently managing calls with the hold function allows for seamless multitasking and professional call handling.
Transferring Calls
Polycom HD Voice phones facilitate seamless call transfers to other extensions within your network. To initiate a transfer‚ first place the current call on hold by pressing the ‘Hold’ soft key. Then‚ either dial the extension number of the desired recipient directly or select a contact from your directory. Once connected to the new party‚ inform them of the incoming call and the caller’s details.
To complete the transfer‚ press the ‘Transfer’ soft key. This will disconnect you from the current call and connect the original caller to the new extension. Some systems may offer a ‘warm transfer’ option‚ allowing you to briefly speak with the recipient before completing the transfer‚ ensuring a smoother handover. Always confirm the recipient is available before transferring a call.
Conference Calling ⏤ Adding Participants
Polycom HD Voice phones enable efficient conference calls‚ allowing multiple participants to join a single conversation. To initiate a conference‚ first establish a call with the initial participant. Place this call on hold using the ‘Hold’ soft key. Then‚ dial the extension or phone number of the next participant you wish to add to the conference.
Once connected to the second party‚ press the ‘Conference’ soft key. This will bridge the two calls‚ creating a three-party conference. You can continue adding participants by repeating the process of placing the current conference on hold and dialing the next extension‚ followed by pressing ‘Conference’ again. Remember that VVX models can manage up to 24 active calls‚ including those on hold or in conferences.

Advanced Features and Settings
Explore customizable options like line keys‚ extension numbers‚ volume control‚ and ringtone settings to personalize your Polycom HD Voice phone experience.
Understanding Line Keys and Extension Numbers
Line keys on your Polycom phone provide quick access to frequently used features or contacts. These programmable keys can be assigned to specific lines‚ speed dial numbers‚ or even advanced call management functions. Your system administrator configures these‚ tailoring the phone to your specific needs.
Regarding extension numbers‚ a Polycom VVX phone can support up to six unique extension numbers‚ or share the same extension as other devices on the network. This flexibility allows for streamlined communication within your organization. The maximum call capacity for VVX 301‚ 401‚ 501‚ and 601 models is 24 active‚ incoming‚ and held audio calls simultaneously. However‚ only one call can be actively in progress at any given time‚ alongside numerous calls on hold or incoming.
Understanding how line keys and extensions work together enhances your phone’s usability and efficiency.
Adjusting Volume Control
Polycom HD Voice phones offer granular control over audio levels‚ ensuring a comfortable and clear communication experience. You can independently adjust the handset volume‚ speakerphone volume‚ and headset volume to suit your preferences and the surrounding environment. Typically‚ dedicated volume control buttons are located on the phone’s base or accessible through the on-screen interface‚ particularly on VVX 501 and 601 models.
To increase or decrease the volume‚ simply press the corresponding volume up or down buttons. Some models may also feature a mute function to instantly silence the audio. Experiment with different volume settings to find the optimal level for various situations‚ such as private conversations or conference calls. Proper volume adjustment is crucial for maximizing audio clarity and minimizing distractions.
Remember to consider your headset’s volume control as well.
Customizing Ringtone Settings
Polycom HD Voice phones allow users to personalize their calling experience by customizing ringtone settings. This feature enables you to differentiate between incoming calls on various lines or extensions‚ and even assign unique ringtones to important contacts. Accessing ringtone customization options typically involves navigating through the phone’s settings menu‚ often accessible via the on-screen interface on VVX 501 and 601 models.
Within the settings‚ you’ll usually find a list of pre-loaded ringtones to choose from. You can preview each ringtone before selecting it. Some systems may also allow uploading custom ringtones‚ providing even greater personalization. Remember to save your changes after selecting a new ringtone. Customizing ringtones can significantly improve call identification and overall user experience.
Consult your system administrator for advanced options.
Managing Contacts and Directory
Polycom HD Voice phones offer robust contact management features‚ streamlining your communication process. Depending on the model (VVX 301‚ 401‚ 501‚ or 601)‚ accessing the directory and contact list varies. Typically‚ a dedicated directory icon or soft key provides access to stored contacts. You can add new contacts directly on the phone‚ inputting names and corresponding phone numbers.
Many Polycom systems integrate with centralized directory services‚ allowing access to a company-wide contact database. This ensures you always have the most up-to-date contact information. Editing existing contacts and deleting outdated entries are also straightforward processes. Utilizing the directory and contact features significantly reduces dialing errors and improves call efficiency.
Refer to your system administrator for directory synchronization details.
Troubleshooting Common Issues
This section provides solutions for frequent problems like no dial tone‚ poor audio‚ and network connectivity. Factory resets are also explained for resolving persistent issues.
No Dial Tone Troubleshooting
Experiencing no dial tone can be frustrating‚ but several steps can resolve this issue. First‚ verify the phone’s power connection – ensure the power adapter is securely plugged into both the phone and a working electrical outlet. Next‚ check the network cable; confirm it’s firmly connected to both the phone and the network jack.
If the connections are secure‚ try a different network cable to rule out a faulty cable. Also‚ confirm that your network is functioning correctly by testing another device. If other devices also lack internet access‚ the problem lies with your network‚ not the phone.
If the network is working‚ the issue might be with the phone’s registration. A reboot can often resolve registration problems. Finally‚ contact your system administrator to verify your extension is properly provisioned and activated within the phone system. They can confirm account status and troubleshoot any backend configuration issues.
Poor Audio Quality Solutions
Experiencing poor audio quality during calls can stem from various factors. Initially‚ check your headset or handset for damage; a faulty device can significantly impact sound clarity. Ensure the volume is appropriately adjusted – too low or too high can distort the audio. If using a speakerphone‚ confirm it’s positioned correctly and free from obstructions.

Network congestion can also contribute to poor audio. Try closing bandwidth-intensive applications on your computer if connected via the same network. Verify the network cable is securely connected and undamaged‚ as a weak connection can cause packet loss.
If the issue persists‚ contact your system administrator to investigate potential network-wide problems or codec settings. They can assess the quality of service (QoS) and optimize settings for clearer calls. A phone reboot can sometimes resolve temporary software glitches affecting audio processing.
Network Connectivity Problems
If your Polycom phone fails to connect to the network‚ several troubleshooting steps can be taken. First‚ verify the physical connection: ensure the network cable is securely plugged into both the phone and the network jack. Inspect the cable for any visible damage‚ such as kinks or breaks. Try a different network cable to rule out a faulty cord.
Next‚ check if other devices on the network have internet access. If not‚ the issue likely lies with your internet service provider or router. Rebooting your router and modem can often resolve temporary connectivity issues. Confirm the phone has obtained an IP address; this can usually be found in the phone’s settings menu.
If the phone still cannot connect‚ contact your system administrator to verify network configuration and ensure the phone is properly registered with the VoIP system.
Resetting the Phone to Factory Defaults
Resetting your Polycom phone to factory defaults will erase all customized settings and restore it to its original configuration. This should only be performed as a last resort‚ as it requires reconfiguring the phone entirely. Before proceeding‚ document any custom settings you wish to retain‚ such as extension numbers or personalized ringtones.
The reset process varies depending on the specific Polycom model. Generally‚ it involves accessing the phone’s settings menu through the interface. Locate the “Factory Reset” or “Reset to Defaults” option. You may be prompted to confirm your decision.
Caution: This process will delete all user data. After the reset‚ the phone will reboot and require a new initial configuration‚ similar to when it was first unboxed. Contact your system administrator if you encounter difficulties or are unsure about the reset procedure.

System Administrator Settings (Overview)
Administrators manage crucial phone functions‚ including call capacity – VVX models handle up to 24 calls – and configure extension numbers for network users.
Maximum Call Capacity (VVX Models)
Polycom VVX series phones‚ specifically the VVX 301‚ 401‚ 501‚ and 601 models‚ are designed to handle a significant volume of concurrent call activity. However‚ understanding the limitations is crucial for optimal system performance. These phones can manage a maximum of 24 active‚ incoming‚ and held audio calls simultaneously.
It’s important to note that while the system can handle 24 calls‚ only one active conversation can be in progress at any given time on a single phone. The remaining calls can be placed on hold or directed as incoming calls. Furthermore‚ the system administrator possesses the ability to configure each phone with up to six distinct line keys‚ each potentially associated with a unique extension number. This flexibility allows for customized call routing and user accessibility within the network. Proper configuration by the administrator ensures efficient call distribution and prevents system overload.
Extension Number Configuration
Your Polycom phone system allows for flexible extension number configuration‚ managed by your system administrator. Up to six unique extension numbers can be assigned to a single phone‚ providing dedicated lines for different purposes or users. Alternatively‚ multiple phones on the network can share the same extension number‚ facilitating call routing to a specific department or group.
This configuration is crucial for directing incoming calls efficiently and ensuring seamless communication. The administrator controls these settings‚ tailoring the system to the organization’s specific needs. Each line key on the phone can be programmed to correspond to a particular extension. This allows users to quickly access frequently used numbers or departments. Proper extension number planning optimizes call flow and enhances overall system usability‚ streamlining communication processes within the organization.